Software spotlight: Archiving VTERM II

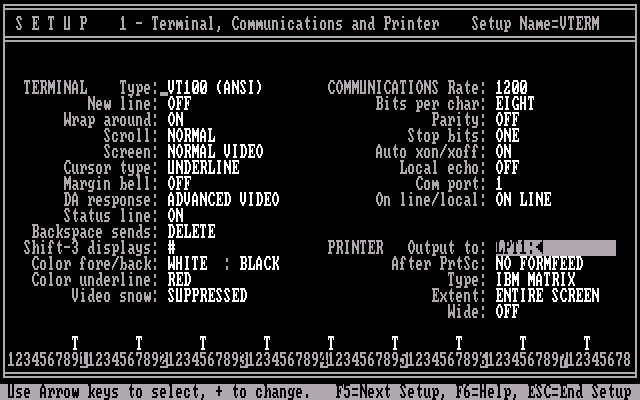
VTERM is a PC telecommunications program designed to emulate the DEC VT100 and interface with Digital Equipment Corporation systems. In addition to emulating a terminal, it supports binary file transfers. VTERM was primarily targeted at large corporations that also owned, used, or interfaced with large VAX VMS or PDP systems.
VTERM II supports baud rates up to 9600, and file transfers using ASCII, VTRANS7, VTRANS7, or XMODEM. Later versions supported the Kermit file transfer protocol.
https://winworldpc.com/product/vterm/ii
OK, VTERM by itself isn't much to talk about, so instead I'll discuss the process I went through to archive it.
Step 1: Buy crap on eBay!
I don't know why some people claim this part is so difficult. I guess the hard part is money, but $0.99 items are often worth archiving just as much as some $500 item. It just takes some patients for a good deal to come up, and knowing what you want. A random, used, software box from a lesser known vendor like this one might sell for $20-$25. A single software floppy can be around $10 unless it is some well known and widely desirable title. Budget CD-ROM titles can often turn up at that low $0.99 mark.
It is a tad bit of gamble if the disks are readable, and the software set is complete. I've had pretty good luck so far.
Next, Inspect the package.
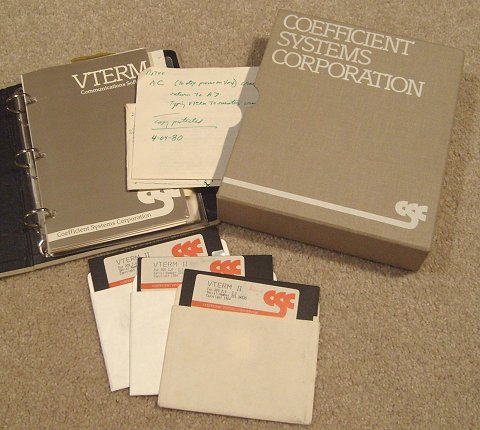
This is a nice cloth-bound slip cover box with a 3-ring binder, which is easy to scan. Everything appears clean and it seems to have been well stored. The disks and manual visually appear to be what they claim to be, an IBM PC software program.
There is a user written note with it indicating that it is copy protected and at least one of the disks is a replacement for a worn out disk. Usually I have to figure this out only after dumping the disk.
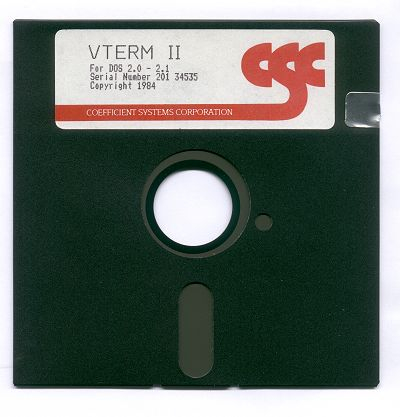
All three 5.25" disks are heavily used and in poor condition. The presence of hub rings suggest they are double sided double density. There are write protect tabs on two disks, but they look user applied. This tells me it is highly probable these are user modified somehow. The disk cookie turns freely and the disk jackets look fairly clean.
The nature of this software (early communications software) suggests it was produced in low numbers, so it may not be professionally mastered.
First action: scan the disks.
The process of testing, cleaning, and reading a disk can put wear on a disk label or even completely destroy it. It is best to get high a quality scan before proceeding.
There is little point scanning anything else yet. If the disks aren't readable, manual or box scans won't mean much.
Cleaning the disks:
As I mentioned, the surface of the disks "cookie" are in bad shape. Holding it up to a light shows many unevenly spaced concentric circles with a rather grungy appearance. This is indicative of heavy usage in a less than ideal environment.
I tried to get a scan showing this damage, however it was not quite visible in the scan. This has to do with the angle at which light must reflect.
Although they appear to have been well stored and the labels are in good shape, this damage hints at a significant risk of dirt or other contaminants inside the disk jacket. These labels are not water resistant. Getting the labels wet would damage them. The printer ink could smear and the label paper would certainly warp.
Carefully running warm water in to the disk jacket around the hub cleans out most potentially damaging contaminants.

Cleaning went smoothly, and I manage to avoid getting the labels wet. Now the trick is getting them dry. Q-tips inserted around the hub let air in so it can dry out. I'll use a fan or an air purifier for air circulation.
The jacket lining on these particular disks seem a little thicker than average and feel like they hold more water, making them take a bit longer to dry.
The cleaning did not seem to make a difference in the visual appearance of the disk cookie.
I'd hate to think that these disks had been used to the point where they were all unreadable. But that was the fate of much copy protected software!
I move around the q-tips a couple of times during drying. This changes the air flow a bit and I note that nothing seems to be sticking between the cookie and the jacket. I notice that the cookie in these particular disks does not want to turn until it is absolutely dry.
Finally, after it dries, I spot-check and try touching up with a damp q-tip. With a final inspection I'm satisfied that despite the rough appearance there is no gunk still on the disks that might foul the drive or cause additional damage to the disk.
Checking for copy protection:
I make the first pass using the Kryoflux to save a flux stream file. The flux histogram displayed by the Kryoflux GUI looked good, indicating the disks were indeed double sided double density 48TPI. I then test the dump using the HxC software, the PCE tools, and the Kryoflux software. The image successfully decodes as a 360k IBM PC image. Surprisingly all sectors test OK in all of the tools.
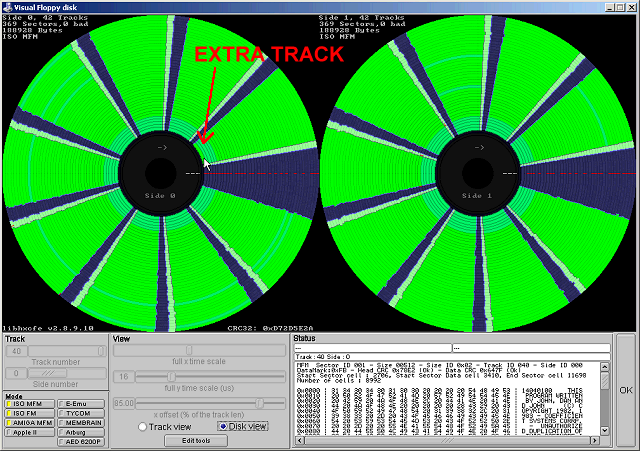
Looking for anomalies using the HxC software, it looks like these disks use the 41st track. No other odd disk geometry stands out, and the 41st track (track number 40, counting from zero) seems to contain a normal PC track format. Surprisingly these disks were professionally mastered. This enables the Kryoflux to detect if the user wrote anything to the disk.
I verify in an emulator that the software refuses to run without that track. Simply giving it an ImageDisk file with the extra track seems to be enough to make the software run.
Not very many copy protection schemes use the 41st track as copy protection. Most professionally mastered disks use that track to store information about the mastering process. Vendors did not commonly use the 41st track for protection, as the BIOS in some clone PCs as well as some oddball floppy drive hardware may not permit stepping beyond the 40th track.
But there is an interesting advantage to doing it this way - the user can completely reformat the disk using the DOS format command and not damage the copy protection.
Checking for the "least common denominator", Kryoflux, SCP, and Transcopy images fully duplicate the disk. I verified ImageDisk and CopyIIPC+Snatchit successfully duplicate the disk as well. In this case, even a normal-ish disk copier that recognizes 41 tracks should work. This is a fairly crude and simple copy protection method.
Continuing on, I dump all 3 disks.
-The original master disk seems to have a few modified sectors. The original user apparently tried to write a small file to the disk. Otherwise, the program is not altered.
- The backup disk shows no modified sectors, so its contents are still in pristine condition.
- The third disk contains a minor program update, and also shows a few modified sectors. It looks like the user may have changed the configuration file. Otherwise, the program is not altered.
Amazingly all sectors were readable and no weak/damaged areas showed up in the Kryoflux dump.
Now, on to scanning the manual:
For the most part this is a typical scan. I started by checking for any foldouts and paperclips. Then scanned to TIFs with a document scanner.
Next, I used a batch file with ImageMagic (mogrify) commands to clean up the scans and convert to PNG. In this specific case, a number of pages were drastically lighter than others so I had to adjust not only the sigmoidal-contrast but also normalize the images. Print that is too light will cause problems with OCRing and deskewing.
As is too common with early unbound 3-ring manuals, a few of the pages did not respect the margin set aside for the hole punches. This makes removing hole punches harder. There is no color except for the title cover, so all other pages can be grayscale.
Then I load the images in to OmniPage, OCR the text, and export as a PDF with "images on text". There may be better tools for the job, but I find the PDF files it outputs are more compatible among different and older PDF readers.
Finally, I check the PDF for incorrectly rotated pages, missing pages, correct page order, image quality, and so on. I did have to make a few adjustments.
All of the disks are now dumped, so I finish up with the box scans and organize them in to an archive set.
Research:
To finish things off, I research the title and write up a little bit about it. This includes searching old magazines on google books, web sites, reviewing the manual, and kicking around the software a bit more.
In this case, what I find is there was an earlier VTERM 1.x that reportedly worked under PC-DOS 1.1, a later version added Kermit file transfer support, there was a separate version that emulated a Tektronix 4010 terminal, and another separate version that emulated a VT220 terminal. VTERM II was eventually followed up with VTERM III.
As a formal commercial brand, companies would have enjoyed the official support and the focus on mainframe interoperability. However, at the time everyone was cranking out terminal emulation programs, both commercial and shareware. There were many viable alternatives with many more features.
Finally after writing up a few paragraphs, I feel I have some extra bits and consider writing a software spotlight. See above. :P
With the archive complete, I uploaded it to all relevant software archive sites.
Although not extremely detailed, hopefully this helps give some idea of the process involved in archiving a piece of floppy software.
Comments
This is a really interesting insight into your process. Thanks for sharing!!